ECU INSTRUCTIONS CONTENTS
Identify Sensors
- Identify where each of the 6 proximity sensors are located.
- This numbering sequence is the sequence recommended by iLIFT.
- When prompted, enter the default password “admin”.
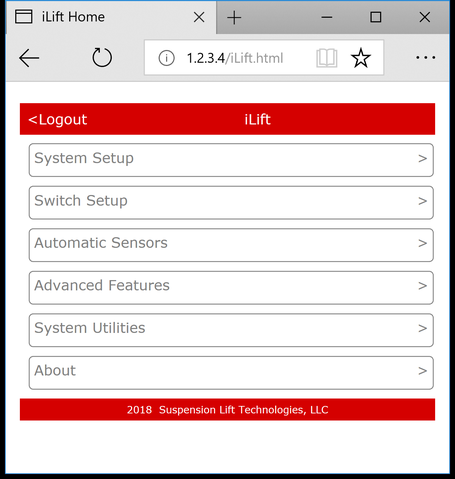
- You will then log-in and be taken to the homepage where you can select the various configuration options of the app.
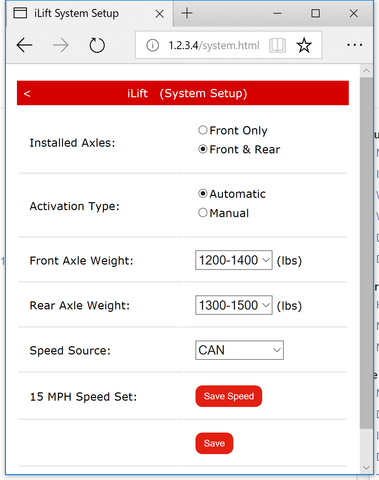
Installed axles:
- Select if you have a front only or optional front & rear system.
Activation Type:
- If you have the optional automated sensors, select Automatic & Manual. Otherwise, leave the setting as Manual.
Front & Rear Axle Weight:
- Select the approximate weight of your vehicle’s front & rear axles.
Speed Source:
- Select None, Pulsed, OBD, or CAN (CAN is only available for application-specific systems).
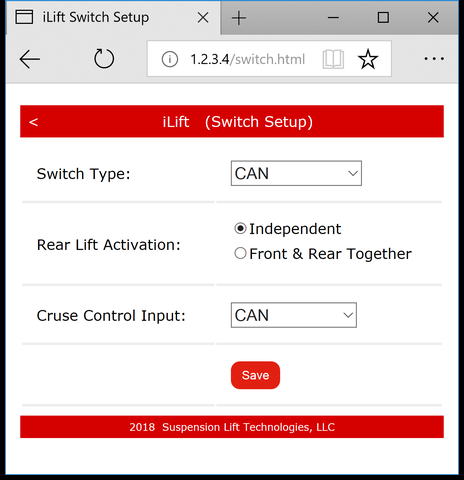
Switch Type:
- Select the switch type you will use (CAN is for application-specific configurations only).
Rear Lift Activation:
- Choose if you want the optional rear lift to be activated at the same time the front lifts, or if you want the rear to lift only if you click the lift switch twice.
Cruise Control Input:
- To use the cruise control switch to activate iLIFT, the ECU must know if cruise control is activated. For Application-specific installations using CAN, leave the configuration set to CAN.
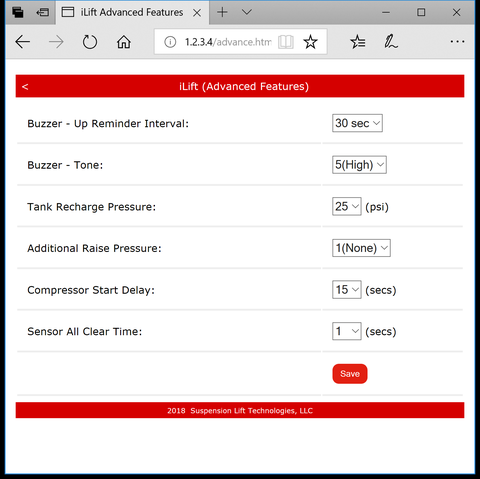
Buzzer Up Reminder:
- The buzzer will prompt at the interval to remind you that the system is up.
Buzzer Tone:
- Select from the various tones.
Tank Recharge Pressure:
- Each time the system lifts, pressure will decrease in the tank. Select the pressure loss you wish for the tank to recharge.
Additional Raise Pressure:
- Leave this setting at 1 (None) unless clicks are heard during lifting. This setting will allow more pressure to raise the vehicle but will consume more air volume. If you continue to hear air clicks, the air tubes may be kinked or otherwise restricted. Inspect to remove the restriction.
Compressor Start Delay:
- The ECU will wait this long before turning on the compressor.
Sensor All Clear:
- Once the optional automated sensors see no obstacle, these many seconds must pass before the ECU will lower the vehicle.
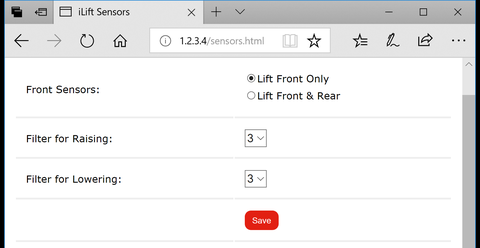
Filters:
- Adjust the filter setting if you receive false activation. 1 = least filtering and fastest response (more prone to false activation). 5 = most filtering and slower response (less prone to false activation).
To calibrate sensors:
- Under ideal conditions, the optional automatic iLIFT Proximity Sensors can measure between 20-150mm (.79” – 5.95”). The default distance from the sensor that triggers the vehicle to lift is 56mm (2.2”) when in the down position. The default distance from the sensor that triggers the vehicle to lower while in the up position is 119mm (4.7”). In most applications, these settings work fine, and do not need adjustment.
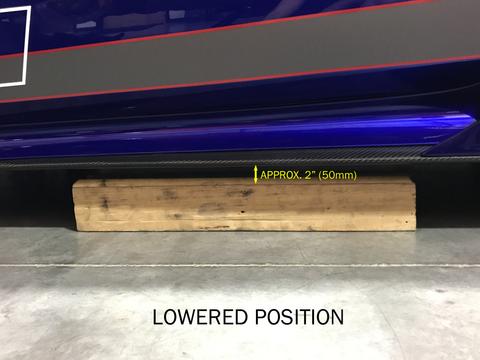
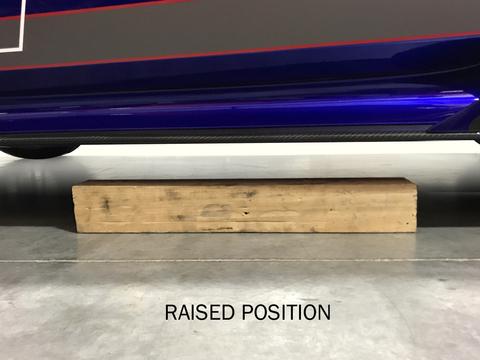
- These ranges can be individually customized for your application for each sensor. To calibrate the sensors, an obstacle will be placed under the sensor approximately 2″ away. Small sections of 2″x4″ wood work well for this purpose. Depending on your vehicle’s ride height, stack sections of the wood, or use thinner shims in order to have the target approximately 2″ away from the sensor. The calibration process can only be conducted when the vehicle is not moving.
- If you are not already, connect to the iLIFT ECU.
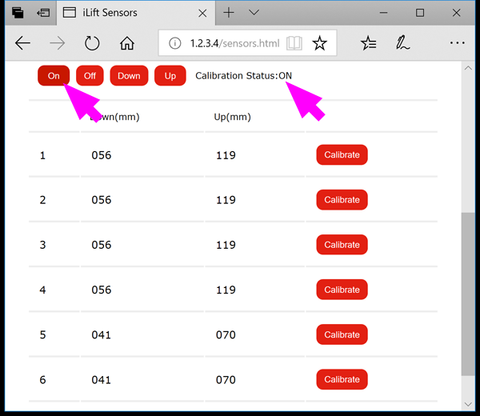
- From the homepage, click “Automatic Sensors”.
- Click “On” to turn on the calibration process. Note Calibration Status changes to ON and the stored sensor calibration measurements are then displayed (in millimeters).
- With the vehicle in the lowered position place obstacle under the sensor that you want to calibrate.
- Note the cable ends of the supplied wire harness were marked with sensor positions. See your installation manual for more details on sensor positions.
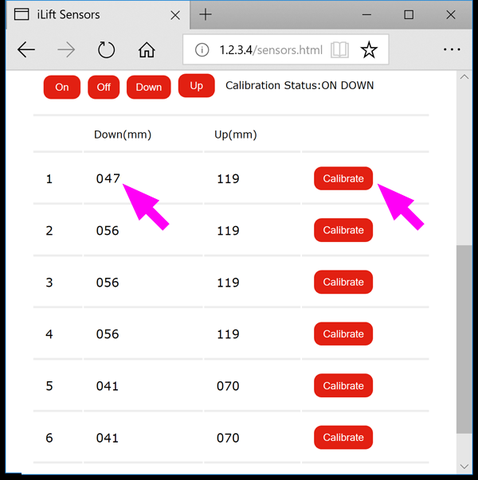
Click “Down”. Note the Calibration Status changes to ON DOWN.
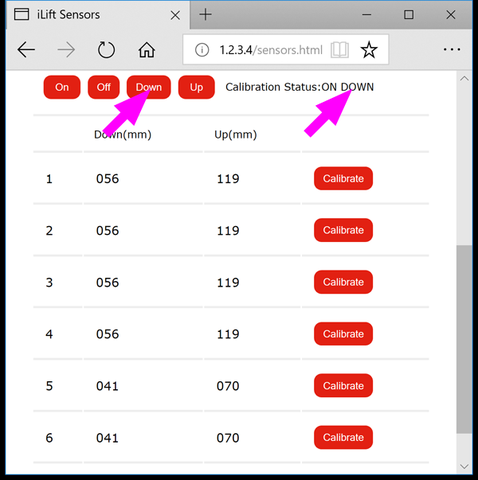
- Click the “Calibrate” button next to the sensor you want to calibrate. Note that the “Down” measurement then updates and the ECU confirms the change with a beep. If the sensor measurement does not update, make sure you are still connected to the iLIFT ECU, Calibration Status reads “ON DOWN”, and you are calibrating the correct sensor. Click the calibrate button again to confirm.
-
- Click “Up” (the vehicle will raise).
- Calibration Status will update to ON UP.
- With the vehicle in the raised position, and the target still in place, click “Calibrate” next to the same sensor position. The “Up” measurement should change.
- Remove the target.
- Click “Down”. The vehicle will lower. The Calibration Status will change to ON DOWN.
- Repeat the process for each sensor. Allow the compressor to fully charge the air compressor to insure the vehicle fully raises.
- When complete, click “Off”. The Calibration Status will change to OFF. The system is now active, and you can test each sensor position that the vehicle raises when the obstacle is placed under the sensor. Note that you may need to raise the target slightly to activate the sensor.
Note:
The engine may need to be running to maintain sufficient battery voltage to allow the air compressor to run (alternatively, a high capacity battery charger may be hooked up during this process). It is not recommended to cycle the compressor more than 5 times every 5 minutes to prevent the circuit from overheating. Allow the compressor to cool as needed.
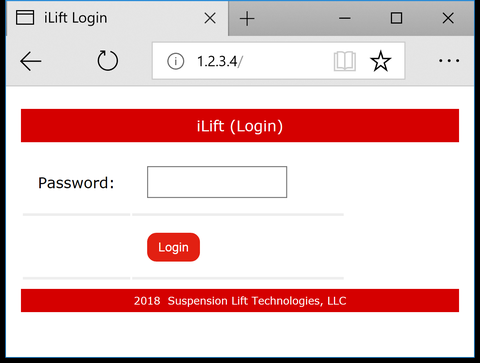
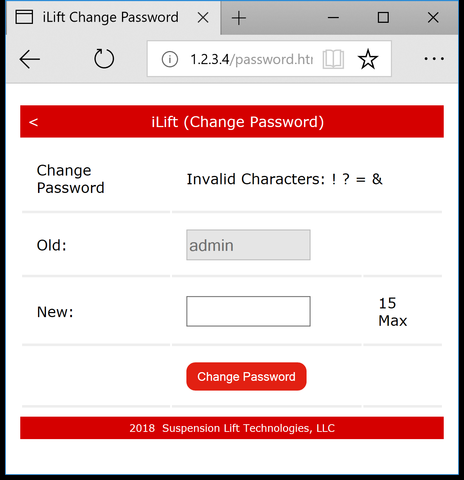
- Enter the password required to modify the web app. The default password is “admin”.
IMPORTANT!
- Do not lose this password. The ECU must be returned to be reset if it is forgotten.
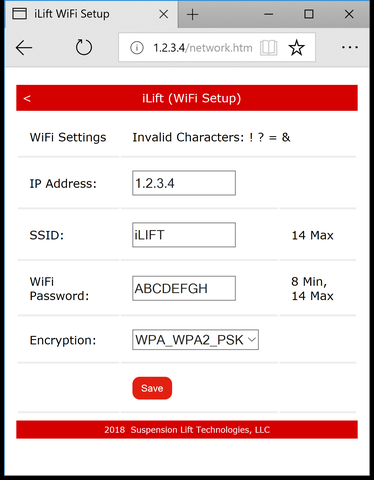
- IP Address:
It is recommended to not modify this setting. - SSID:
It is recommended to not modify this setting unless you own multiple iLIFT systems. - WiFi Password:
Modify the password.
IMPORTANT! Do not use the invalid characters noted, or use a password less than 8 characters or more than 14 characters. - Encryption:
It is recommended to not modify this setting.